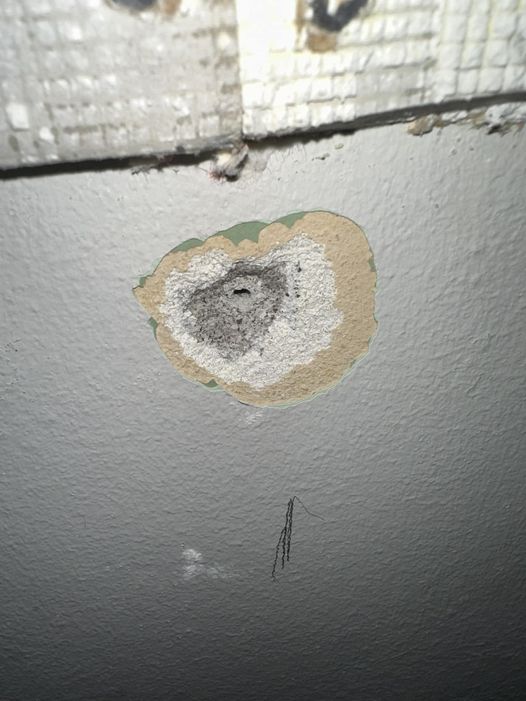
What is this thick cement board-like material found behind drywall and how can it be cleanly removed?
11 months ago
Last Updated: July 26, 2024
We were taking down a wall and discovered something strange under the drywall. Can anyone help me figure out what it is and the best way to remove it without making a mess? It seems to be some sort of cement board, about 1/2″ thick with another 1/2″ of drywall underneath. Thanks for any advice!

There’s no quick fix here. You’ll need to break it down and carefully remove the sheetrock.
Seems like cement, how old is the house? Could you take a picture from further back to see the whole wall?
I wanna mention that the house is from the 1950s, but it was remodeled in the 90s. According to my research, it should have rock lath plaster, essentially plaster veneer, all nailed in with around 20ga steel corner bead.
If it’s from the 1950s, make sure to have it checked for asbestos before you start removing it. Best of luck!
Chances are it’s the old plaster and lath they used in the past. They would attach numerous lath boards to the wall and then apply plaster by hand. It seems like someone just put drywall over it. There’s no easy way to remove it cleanly. It’s going to be a major project if you’re tearing it down to the studs. This is what it looks like beneath the plaster.
It looks like there isn’t any wood lath underneath. My guess is that the drywall beneath is actually the rock lath that was common in the 1950s.
There’s no simple solution. It’s going to get messy
Putting drywall on top of plaster
I’m currently in the middle of a remodel facing the same issue – plaster over drywall. It’s going to be messy, but my plan is to cut out the panel, add a 1/4 inch fur strip to the studs, then cover it with 1/2 inch drywall. After that, tape and mud the seams.
Based on the picture, it seems like there’s a layer of plaster over ‘rock lath’. Rock lath was an early version of drywall. Removing the entire surface will be quite a messy and challenging task. However, if it is rock lath, you might be lucky and able to remove larger sections at once since those boards are typically 16 inches wide.
That’s actually Gypboard and plaster. To cleanly remove it you’ll need to put in a lot of effort. When I took down a few walls in my house, I found that drawing straight lines and using a multitool was the best way to do it neatly. It’s a slow process and creates a lot of dust. I suggest vacuuming as you cut to minimize the dust. Once you reach the metal lath, use a metal cutting blade on your multitool for a clean cut. Dealing with the metal lath is the most challenging part. Instead of investing in high-quality blades, go for a large pack of inexpensive ones since the plaster and board will wear them out quickly. Save the good blade for the lath itself. You can find blades on Amazon for about $1 each, that’s what I recommend for most of the cutting.
I’ve never come across a convenient (clean) method to remove that. Just keep in mind that if it’s old, it might have asbestos so it’s best to wear a mask for protection.
Seems to be cement board, was a great option for 10-20 years but didn’t become widely used because of its heavy weight during installation and high shipping expenses.
That’s lath and plaster, I don’t think there’s a simple way to get rid of it
Just wait until you uncover the chicken wire hidden behind everything
I think the drywall beneath the plaster is rock lath, essentially plasterboard with holes in it. Traditional plastering involves lath, initially strips of wood with a small space between each one, later screen-like metal sheets. In both cases, a thick mix of plaster with filler, horse hair (or maybe sand or similar) and later perlite or the like is applied. It sags through the lath, securing it in place when it dries. Before it hardens, the surface is raked to roughen it. This is the scratch coat. When it’s dry, a layer of the same plaster is applied after wetting the scratch coat. The wet surface and the scratches combine to lock the layers together. This is the brown coat. The finish coat, usually lime putty (hydrated lime mixed with water) mixed with gauging plaster (a type of white plaster), is applied and troweled smooth. Rock lath replaces the lath and the scratch coat, providing a base for the brown coat. That’s the brown-gray plaster you see. If the house was built in the 1950s, based on your description, this is very likely what you are seeing.
It’s pretty simple to scrape off with a prybar. Although, I did encounter a few areas that were as tough as concrete.