How can we lower the water lines in our half bath sink to accommodate the vanity we purchased without compromising its look?
12 months ago
Last Updated: June 24, 2024
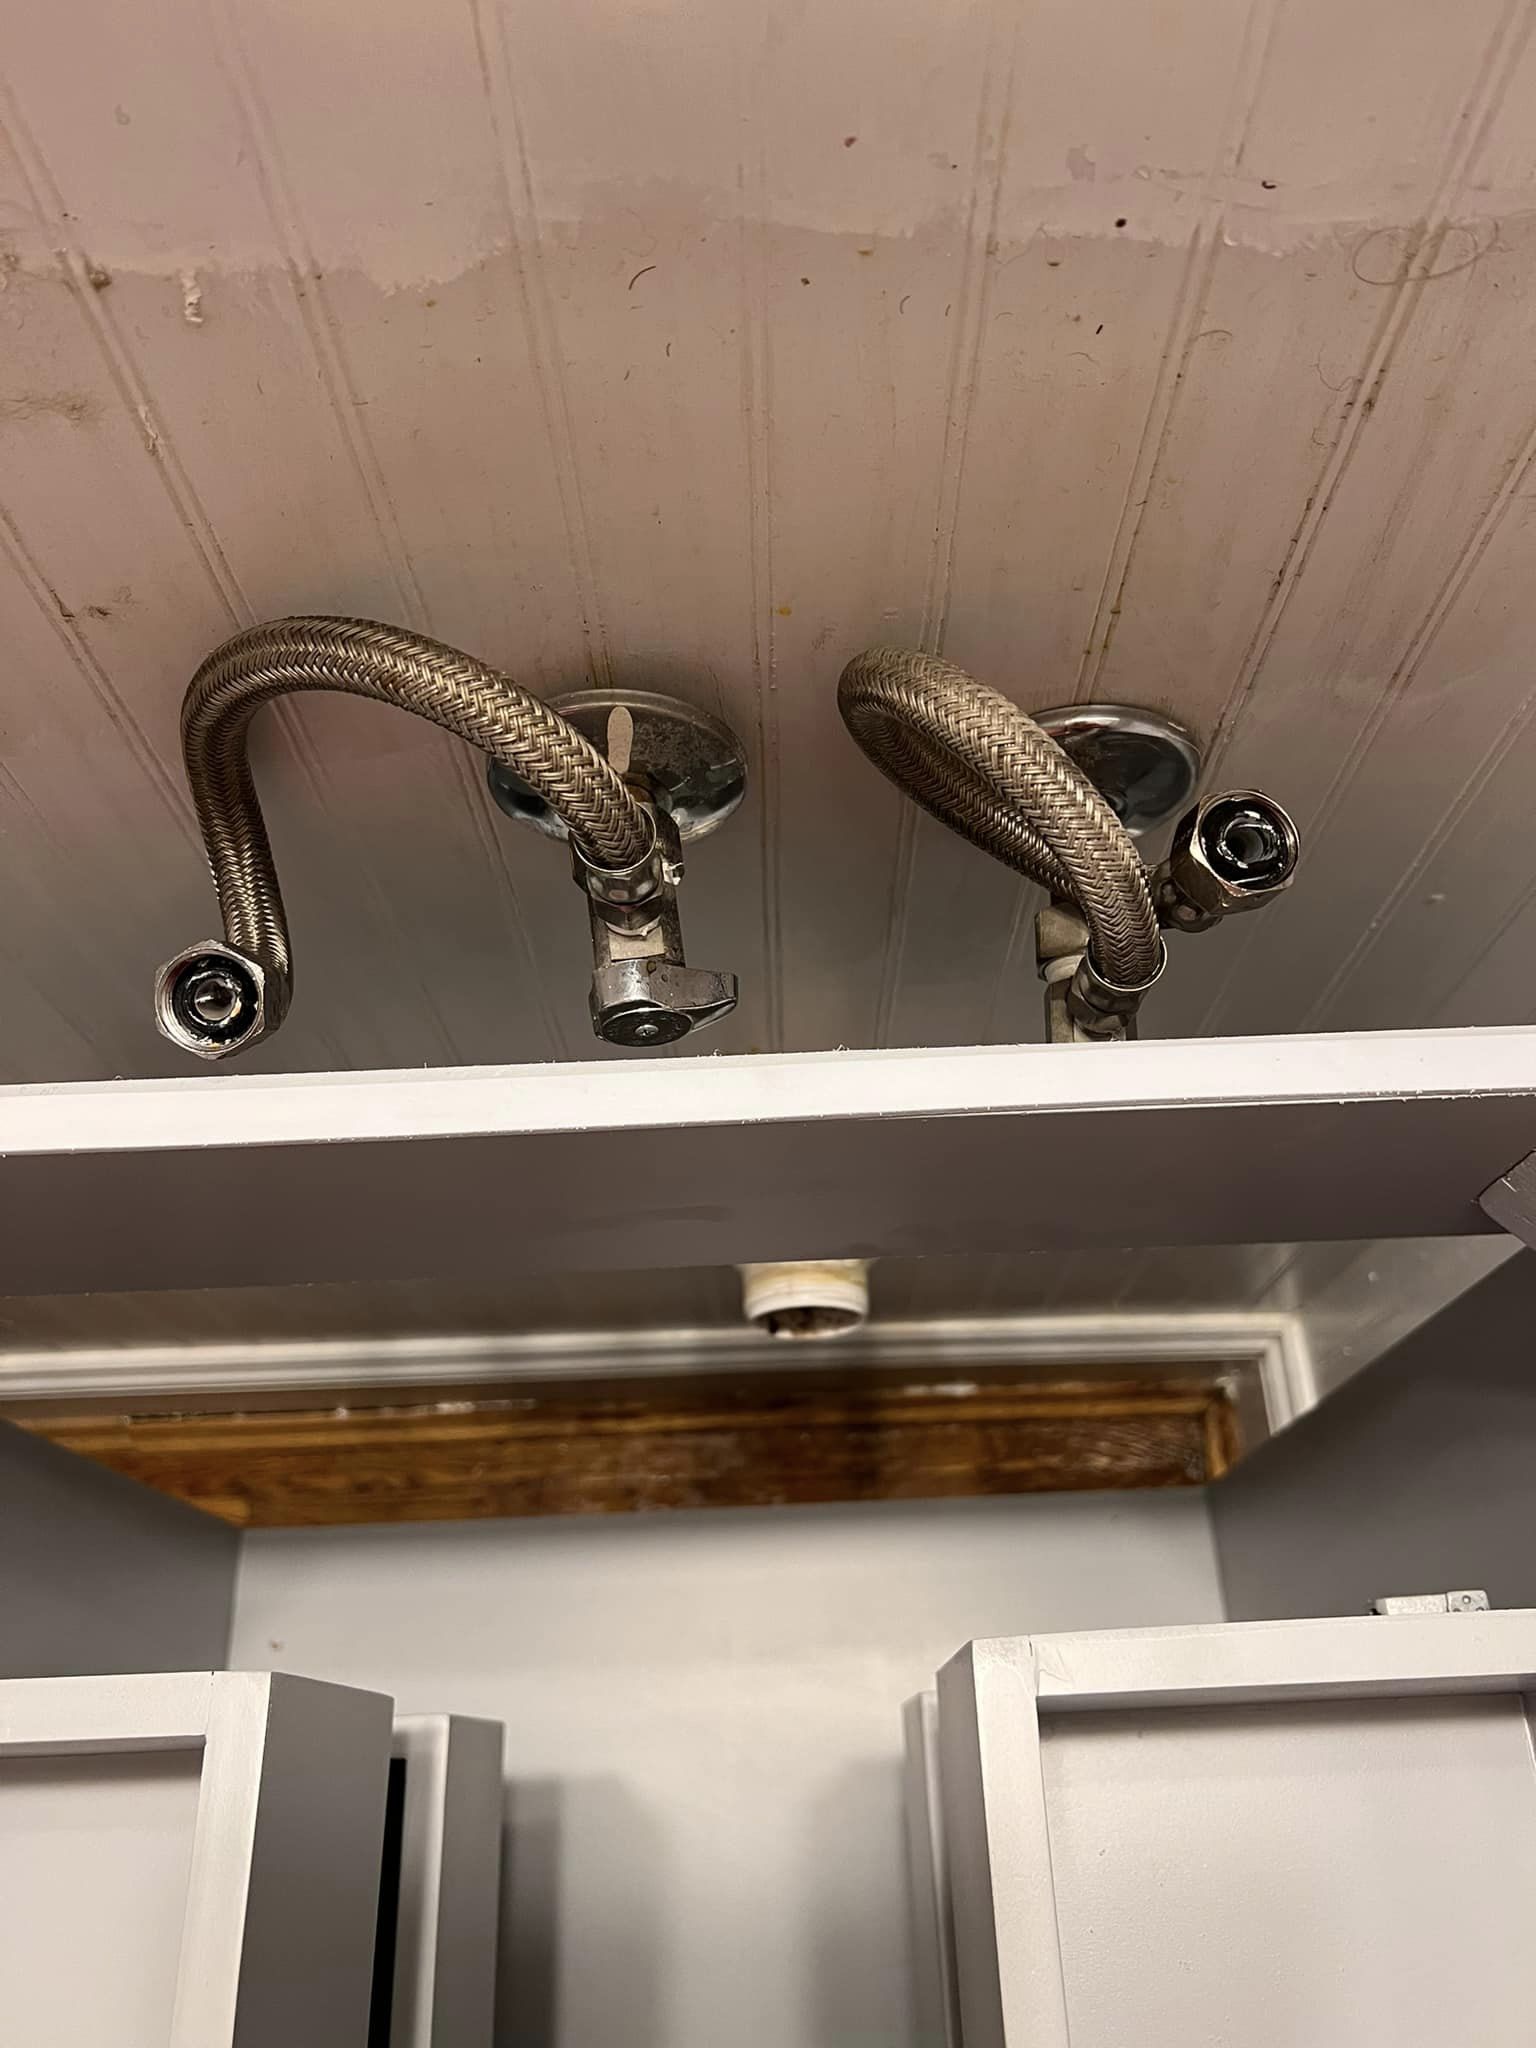
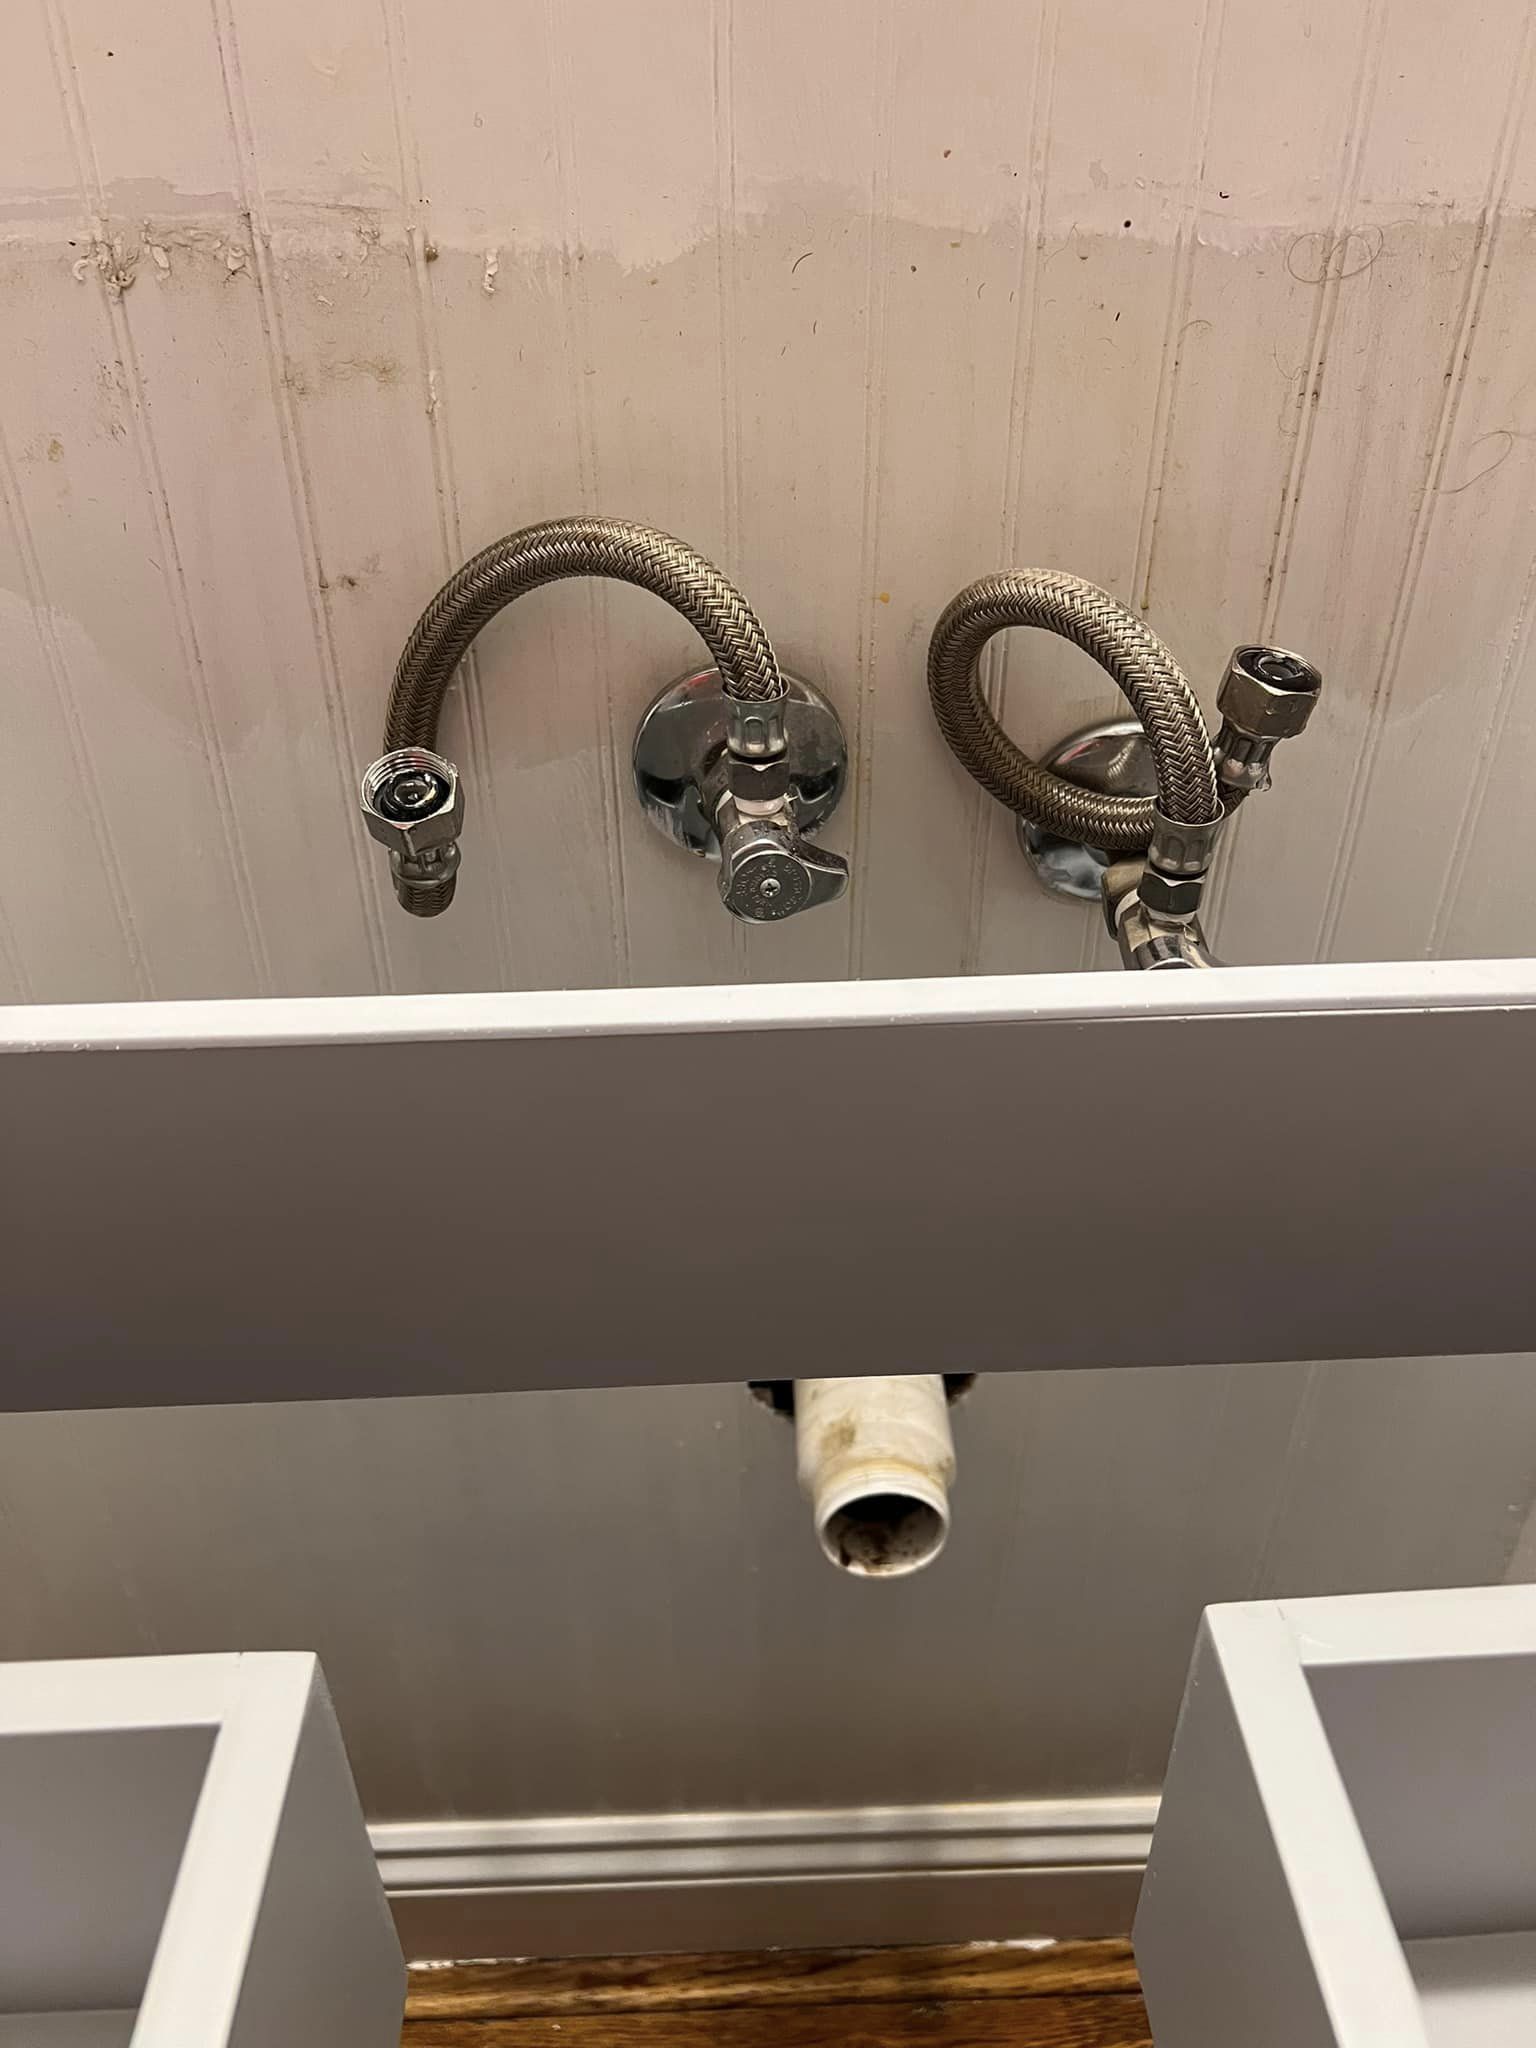
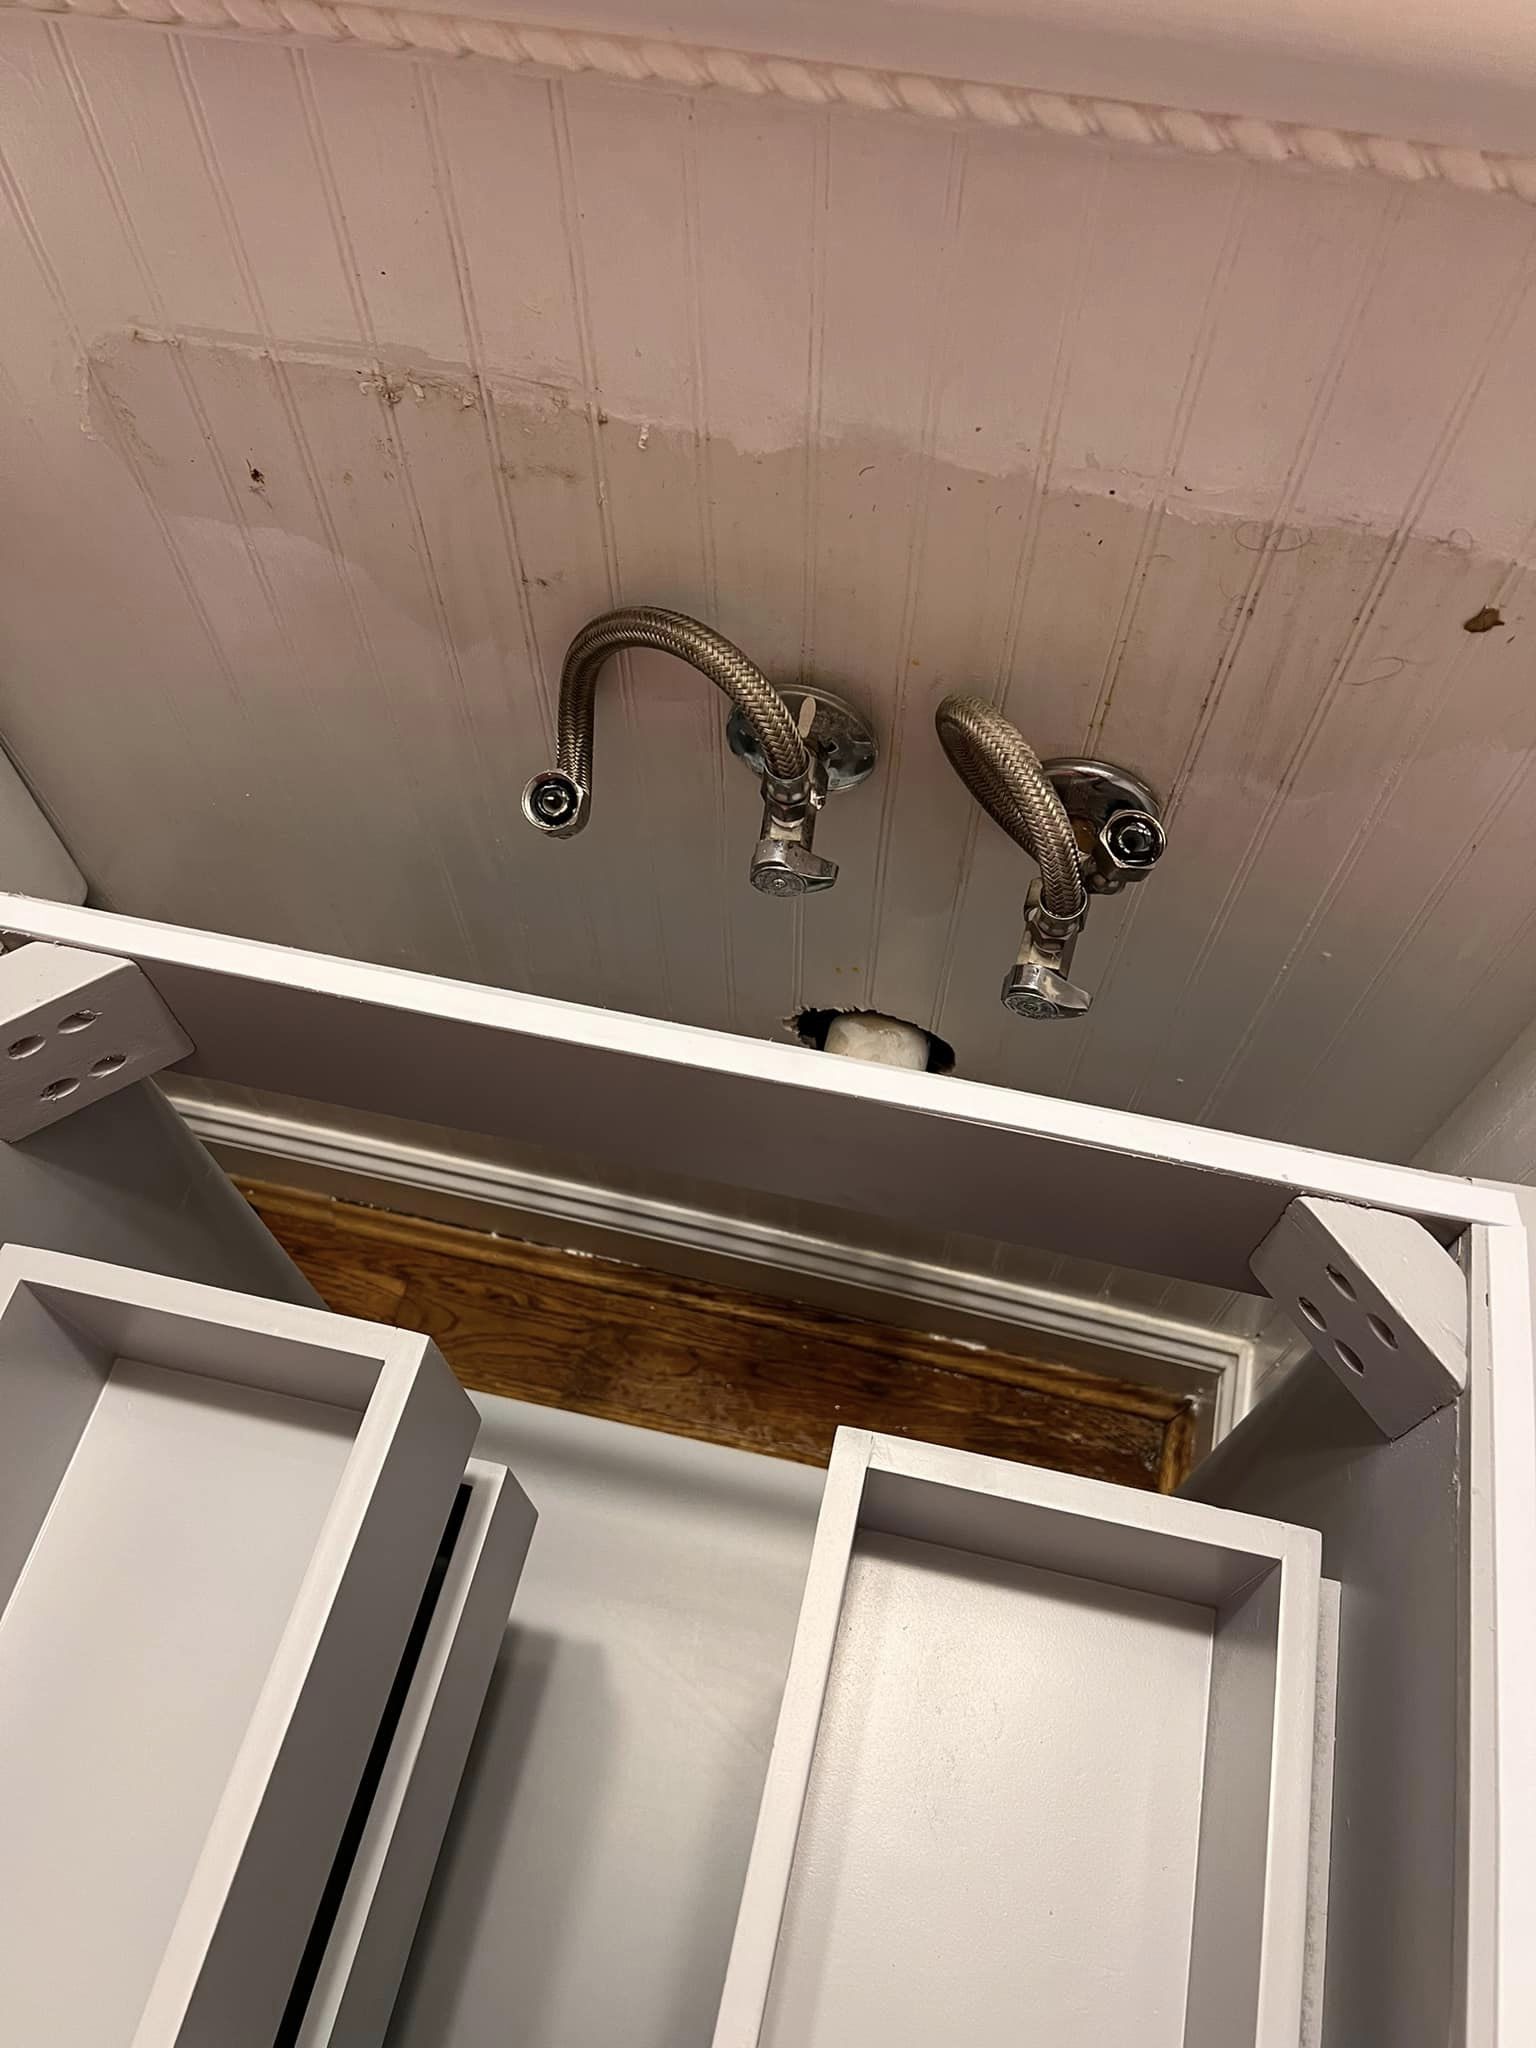
We’re in the middle of replacing the sink in our half bath, but the water lines are too high for the vanity we purchased – they line up with the back panel. I’m really fond of this vanity. Do you have any suggestions on how we could make it work?


Just move them to the desired location.
You’ll need to open up the drywall and lower the valves down.
Make sure to use a hole saw in the back bar to ensure the valves can fit through.
Removing the support and attaching the vanity to the wall studs with wood screws might work.
How about relocating the water lines and shifting the drain to the center?
Could you try adding some longer legs to make it taller?
Trim that 1×4 or whatever it is and shift it down to avoid obstruction.
Make some modifications. I recommend cutting them and leaving some excess material if possible. Once it’s mounted on the wall, that additional support may not be necessary. It appears that you can remove the hoses, then use a large hole saw where the valves are located.
You have the option to either create notches and place it against the wall over the pipes, or you can shut off the water at the main supply and remove the valves. Remember to mark where the pipes will be coming through, then use a drill and a 3/4″ hole saw to cut out the necessary holes. Once done, mount the cabinet over the pipes and reattach the valves along with the beauty rings. Ensure the valves are turned off, then slowly reopen the main supply valve by just about a 1/4 turn before shutting it back off. Check for leaks at the reinstalled valves and if everything is dry, go ahead and turn the water on. Allow it to run for a minute to remove any trapped air in the pipes. If you prefer not to cut the pipe, make sure the hole is large enough to fit over the valve nut. You may need a union and extension for the hot side. Personally, I would have simply marked the spot, made notches with a jigsaw, placed it over the notches, mounted it on the wall, and had everything installed before these instructions were written.
Looks like you ended up with the wrong vanity. Not the best planning.
Why are you being so rude about it?? “Poor planning”! Please stop talking.
Most vanities will feature some type of material on the top.
You’re completely wrong. Why not take a seat and zip it
A little harsh but you’re not mistaken. It’s all about measuring, measuring, measuring. My wife made the same mistake when we got our first home with a half bath. She chose something based on looks without checking the practicality. We had to use FLEXOPIPE to make it work because the cabinet drawers were blocking the J pipe. I ended up replacing it all, but I get how easily this can happen to anyone.
This is a compression fitting.
They screw into the copper stub out.
Simply turn off the water and unscrew them using two wrenches – one for the large nut and the other for the fixture. The large nut and compression ring will remain in place. I noticed someone used Teflon tape on a compression fitting where I marked.
Then use a drill with a hole saw to cut a hole that will fit over the stub out, probably 1″. Then reinstall the valves after sliding the vanity into place, be careful not to overtighten them. Use two wrenches to prevent the fitting (valves) from turning while you tighten the nut.
Turn the water back on and check for leaks.
I concur with this suggestion. I believe it is your best bet if you are doing it yourself.
This could possibly function but might cause issues with the top.
There’s a lot of good advice here, but another option is to create a base and elevate the vanity. Just keep in mind, you may need to do some trim work on the floor afterwards.
I was considering this option. It appears to be a simpler solution compared to drilling and sawing the vanity. Also, I prefer a vanity that is slightly taller.
Another option is to use a filler panel to extend the vanity away from the wall.
Consider replumbing it and shifting everything towards the center to prevent the drawers from hitting each other.
Grab the hose and remove the knob before cutting off the escutcheon. Then mark and drill a hole that will fit around the screw to attach the vanity to the wall and hook it up.
Attach an additional 3/4” piece of wood at the back for support and position it lower in the cabinet. Also, notch the top piece to allow the lines to pass through. Ensure they are below the cabinet’s top to avoid issues with the countertop.
That’s not very useful.
If you need to notch the vanity, make sure it clears the bowl first. It might be difficult to reach the valves or connect the faucet.
A plumber can lower these water lines to provide enough clearance. Or you can do it yourself, it’s not too difficult.
The easiest way is to remove the wood. You can secure the vanity to the wall by mounting the two ends!
Or you could measure and use a hole saw to allow the water lines to pass through the wood. Ignore the previous unhelpful response! There is always a way to solve this.
Use the hole saw to drill through the back of the wood. Turn the valves down so the supply lines can screw on at the bottom. Use larger supply lines and loop them up to the faucet. It looks like there might be enough room, but it’s hard to tell from the picture.
The drywall needs to be cut along the lines to lower it, from stud to stud. Lower the lines to match the top and dry fit it to get it exactly where it needs to be. It looks like your drain is good with this vanity, there’s always a change needed, but you’re almost there.
Create a base to elevate the vanity and make it taller.
I recommend using a 3″ or 4″ hole bit to drill holes in the back brace. Remember to disconnect the supply hoses and turn the supply valves sideways. (Make sure to turn off the water to the house and be ready in case of leaks when turning it back on.. you might have to replace the plumber’s tape to ensure they are properly secured. However, turning them just 1/4 turn should prevent leaking and removing them may not be necessary.) If you have older galvanized pipes, it’s best to have a plumber handle this as they can be fragile and break easily. (Though the plumbing in this picture seems to be newer .. so it should be okay.) Thread the valves through the back. Reconnect the supply hoses. Be sure to screw the back brace into the wall (ideally into studs) to provide support since your back support brace will bear the weight of your countertop and is no longer whole.
The easiest solution would be to disconnect the hoses, create openings in the panel for the valves, and then connect new hoses of the necessary length. It’s a straightforward process.
To ensure the back of the vanity is stable, consider adding an extra panel painted in the same color.
Opening up walls can lead to unexpected issues, so it’s best to avoid it if possible.
Mentioned that the angle stops may be hidden behind the sink unless a surface vessel is used.
If you’re thinking of installing a molded top or drop-in sink, the bowl will block the stops, which could be a problem in case of a leak. If it were up to me, I’d cut into the wall and reposition the stops.
What type of sink are you using? Will you still be able to reach the valves once the sink is installed? If not, you’ll have to adjust the valve placement.
Best: Start by disconnecting the hose lines, then turn off the water supply to the house and take out the shut off valves. Next, drill two holes with the same diameter as the pipe and put them back in place.
Place a 2×4 or 2×6 on the bottom to increase the height of the sink. Just make sure you have enough space once the vanity is installed.
Detach the back support and then reattach it below the pipes
Just detach the back support and slide it down between the water lines and drain, consider cutting around the drain if necessary. If that doesn’t do the trick, detach it completely, trim it on both ends, and turn it 90 degrees so it aligns with the top surface. You can then fasten it to the wall using some angle brackets.
Good: Add a thicker support at the top and another one at the bottom. Modify the board to accommodate everything at once.
To those who insist they bought the wrong vanity, it’s important to note that reputable manufacturers design vanities to be installed at specific rough in heights. Some plumbing companies may hire workers who struggle with this concept, so it’s crucial to stick to the standard measurements of 18″ to 20″ for water lines and 16″ for waste.
I’m interested to see how they plan to connect the line when the sink is positioned like that… and assuming the faucet doesn’t extend down to touch those valves. Just like you mentioned, it’s crucial for the valves to be at the right height.
If your lines are too close together, you can try placing two 90s facing downwards and then extending the lines by about 4 or 5 inches using a street 90 to stub out for new valves. I’ve attached a simple diagram for reference – feel free to reach out if you have any questions!
I wanted to mention that the valves are quite high, and it’s good that you pointed out the importance of rough-in heights falling within the standard range.
Here’s a tip on how to properly position the valves at the right height.
Get rid of the cross bar. Move it downwards. Once the vanity is attached to the wall, you probably won’t need it anymore.
Find where the studs are located, then notch the cross member to make it fit.
The right way to set this up is to first turn off the water, remove the shutoffs and escutcheons, drill 1″ holes in the back plate as necessary, secure the vanity by screwing into a stud through the backplate, and then reattach the escutcheons and shutoffs. One potential problem to watch out for is the cold water supply and shutoff possibly interfering with the drawers on the right side. If there isn’t enough clearance, you can either shorten the drawer box or relocate the supply line.
You should definitely lower your crossbar, but also consider adding a thin strip across the back from corner to corner to provide extra support for the weight of the countertop. Keep in mind that you might run into issues with the drawers.
Make sure to carefully cut around them. Remember, that back panel doesn’t play a structural role once you secure it to the wall.
Let’s open up the Sheetrock and adjust the valves.