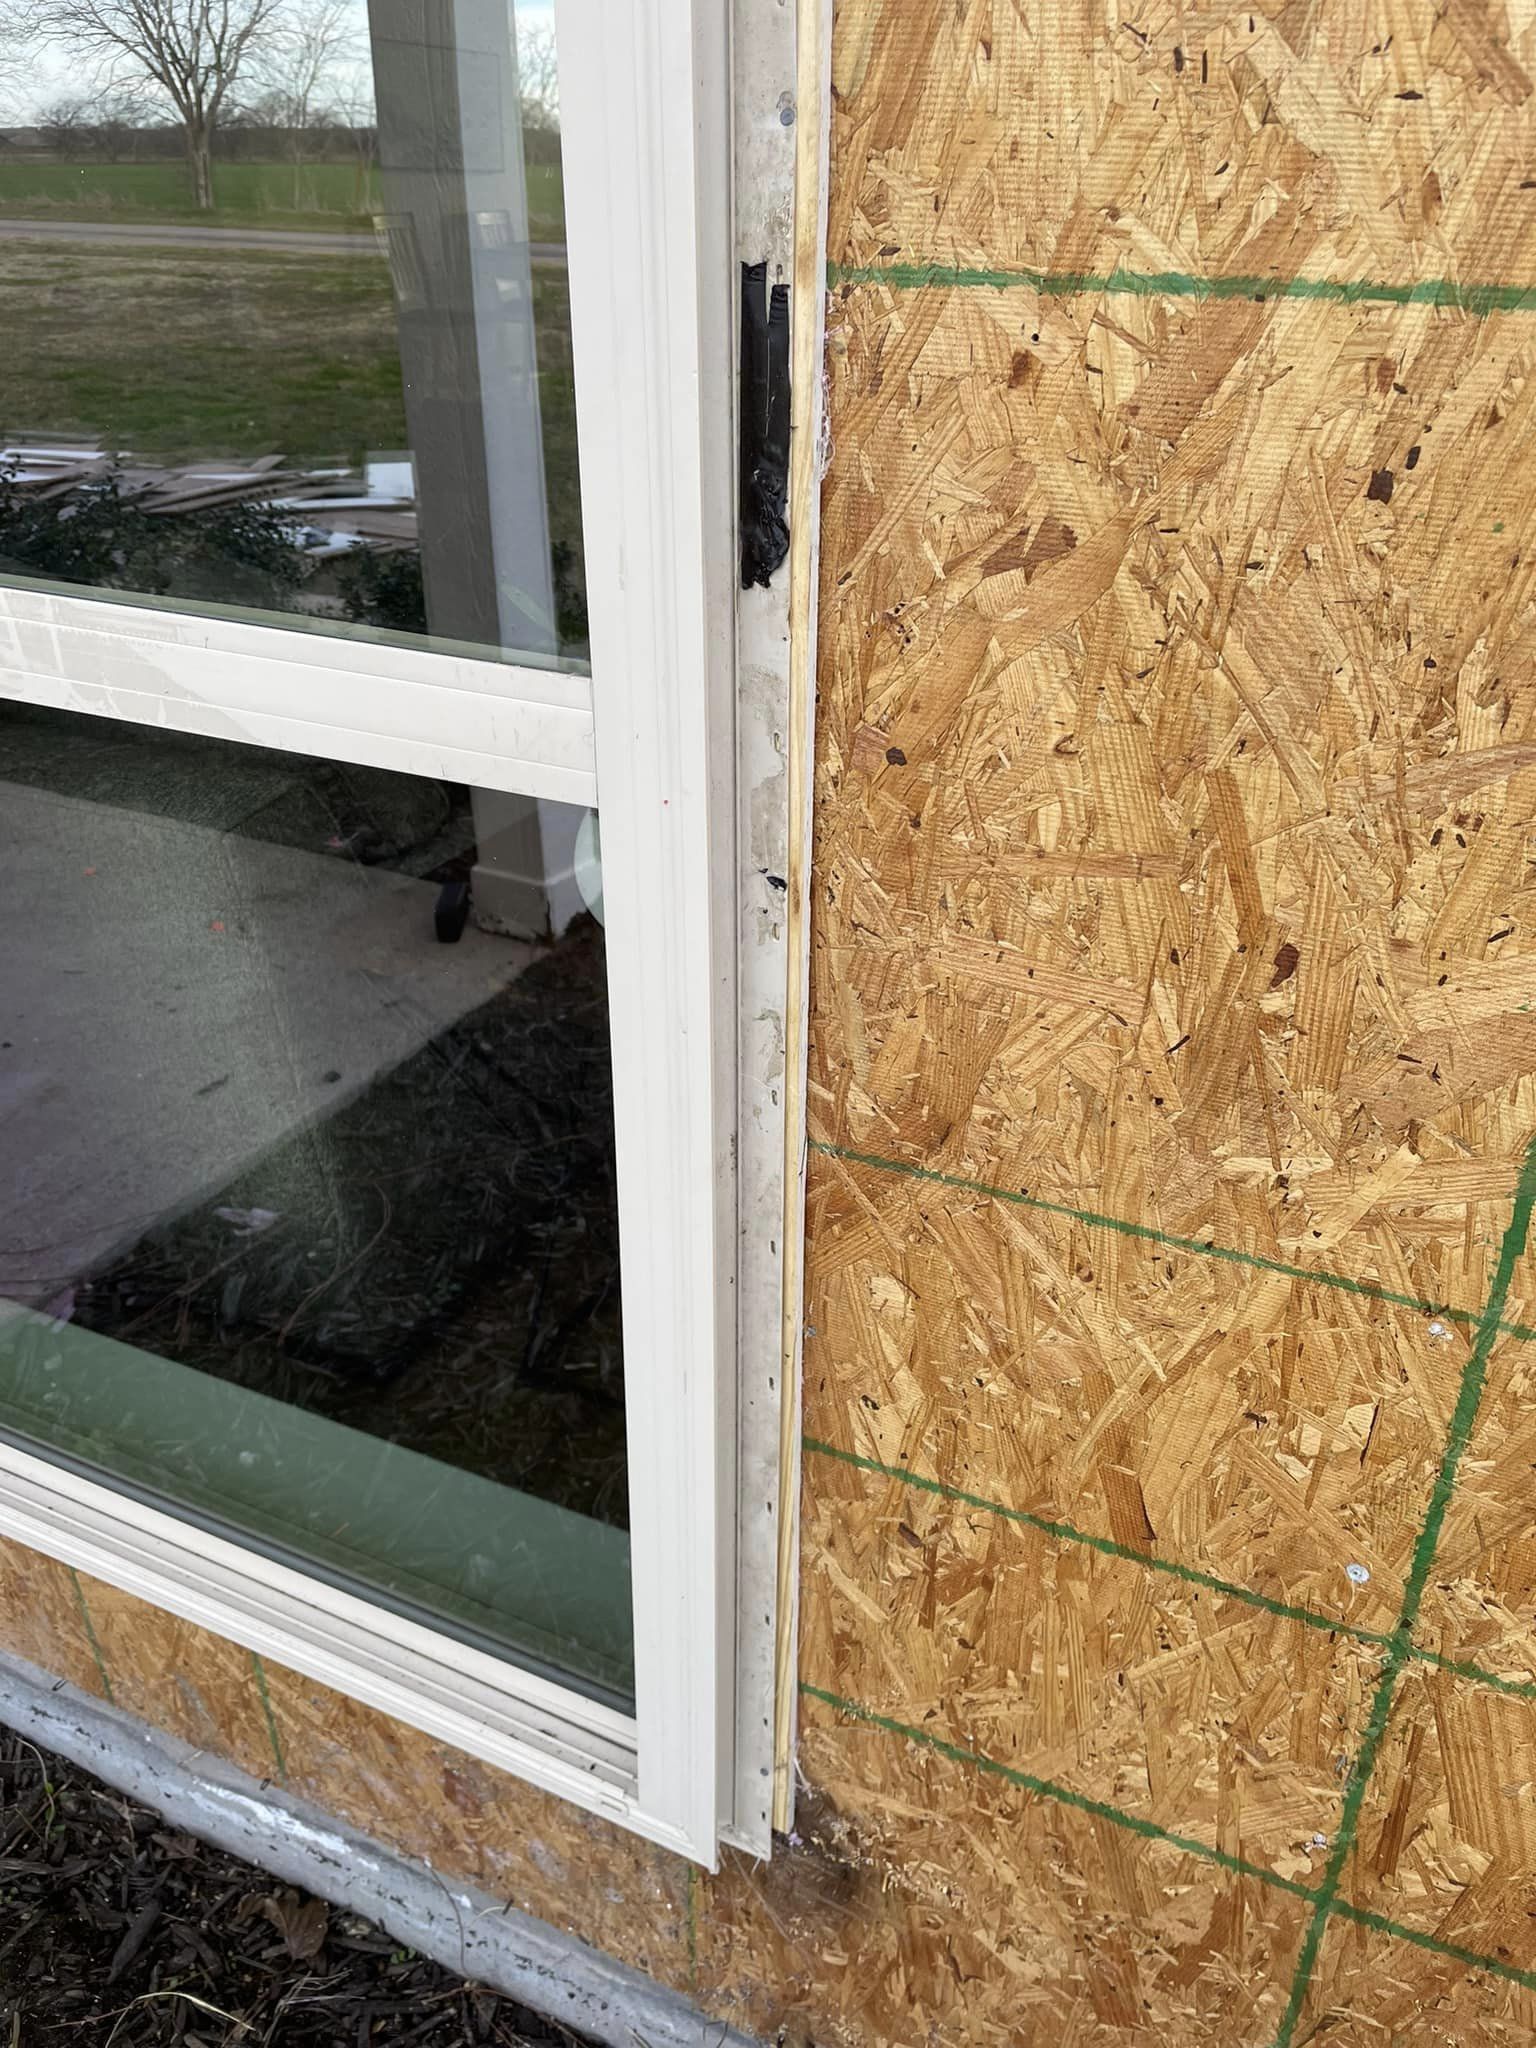
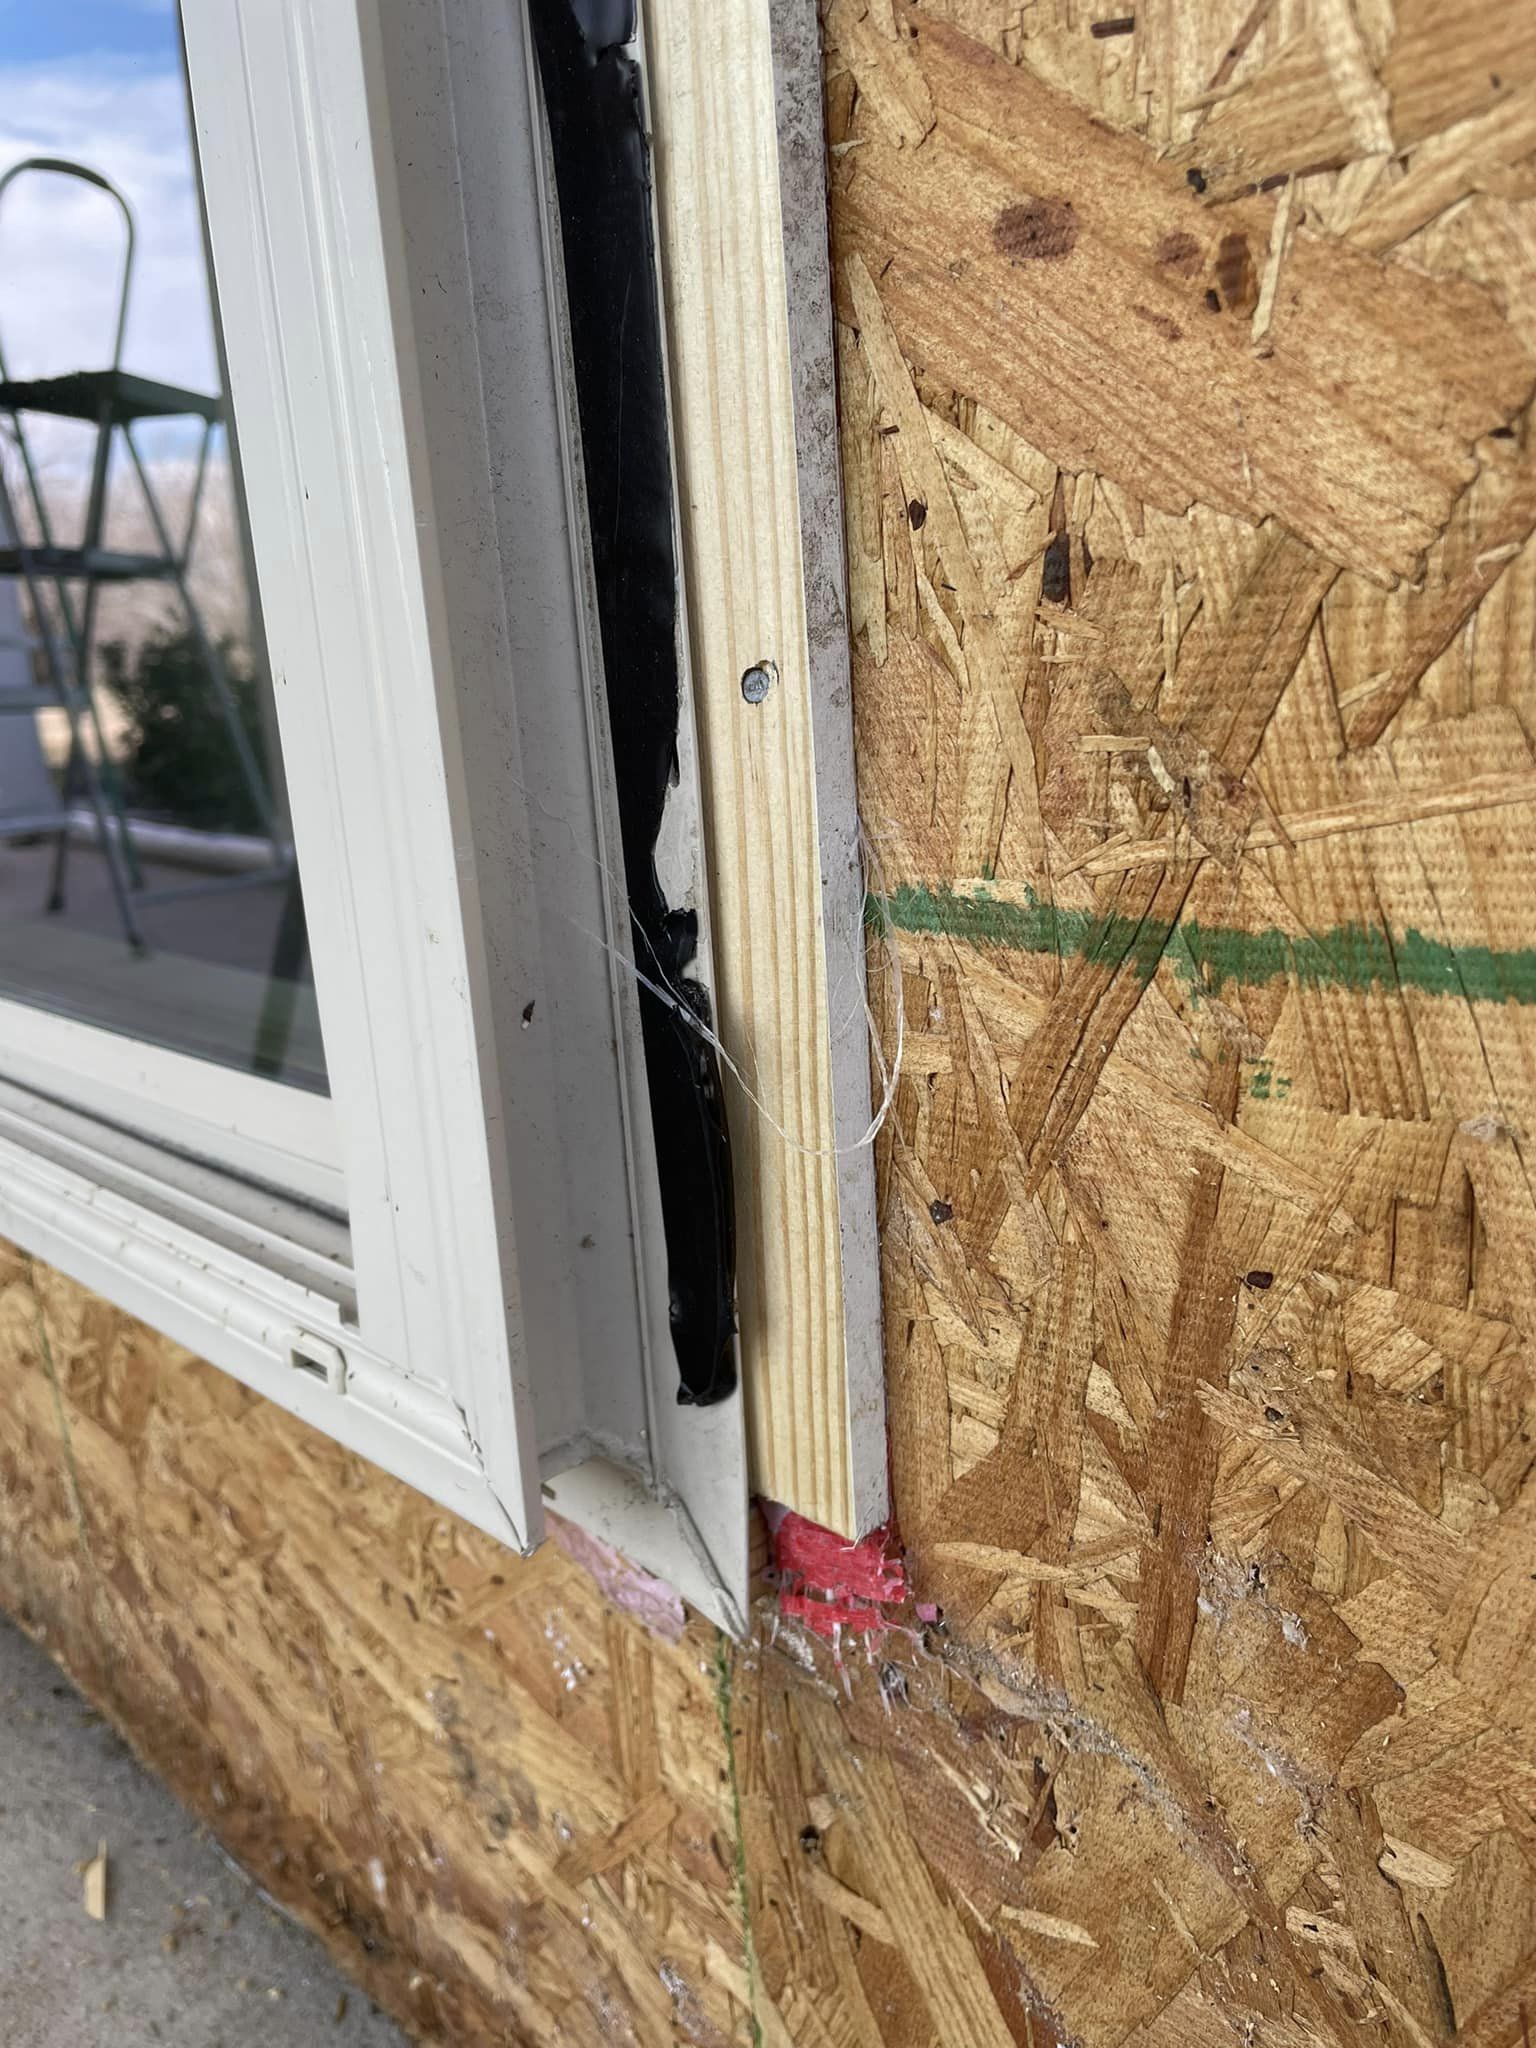
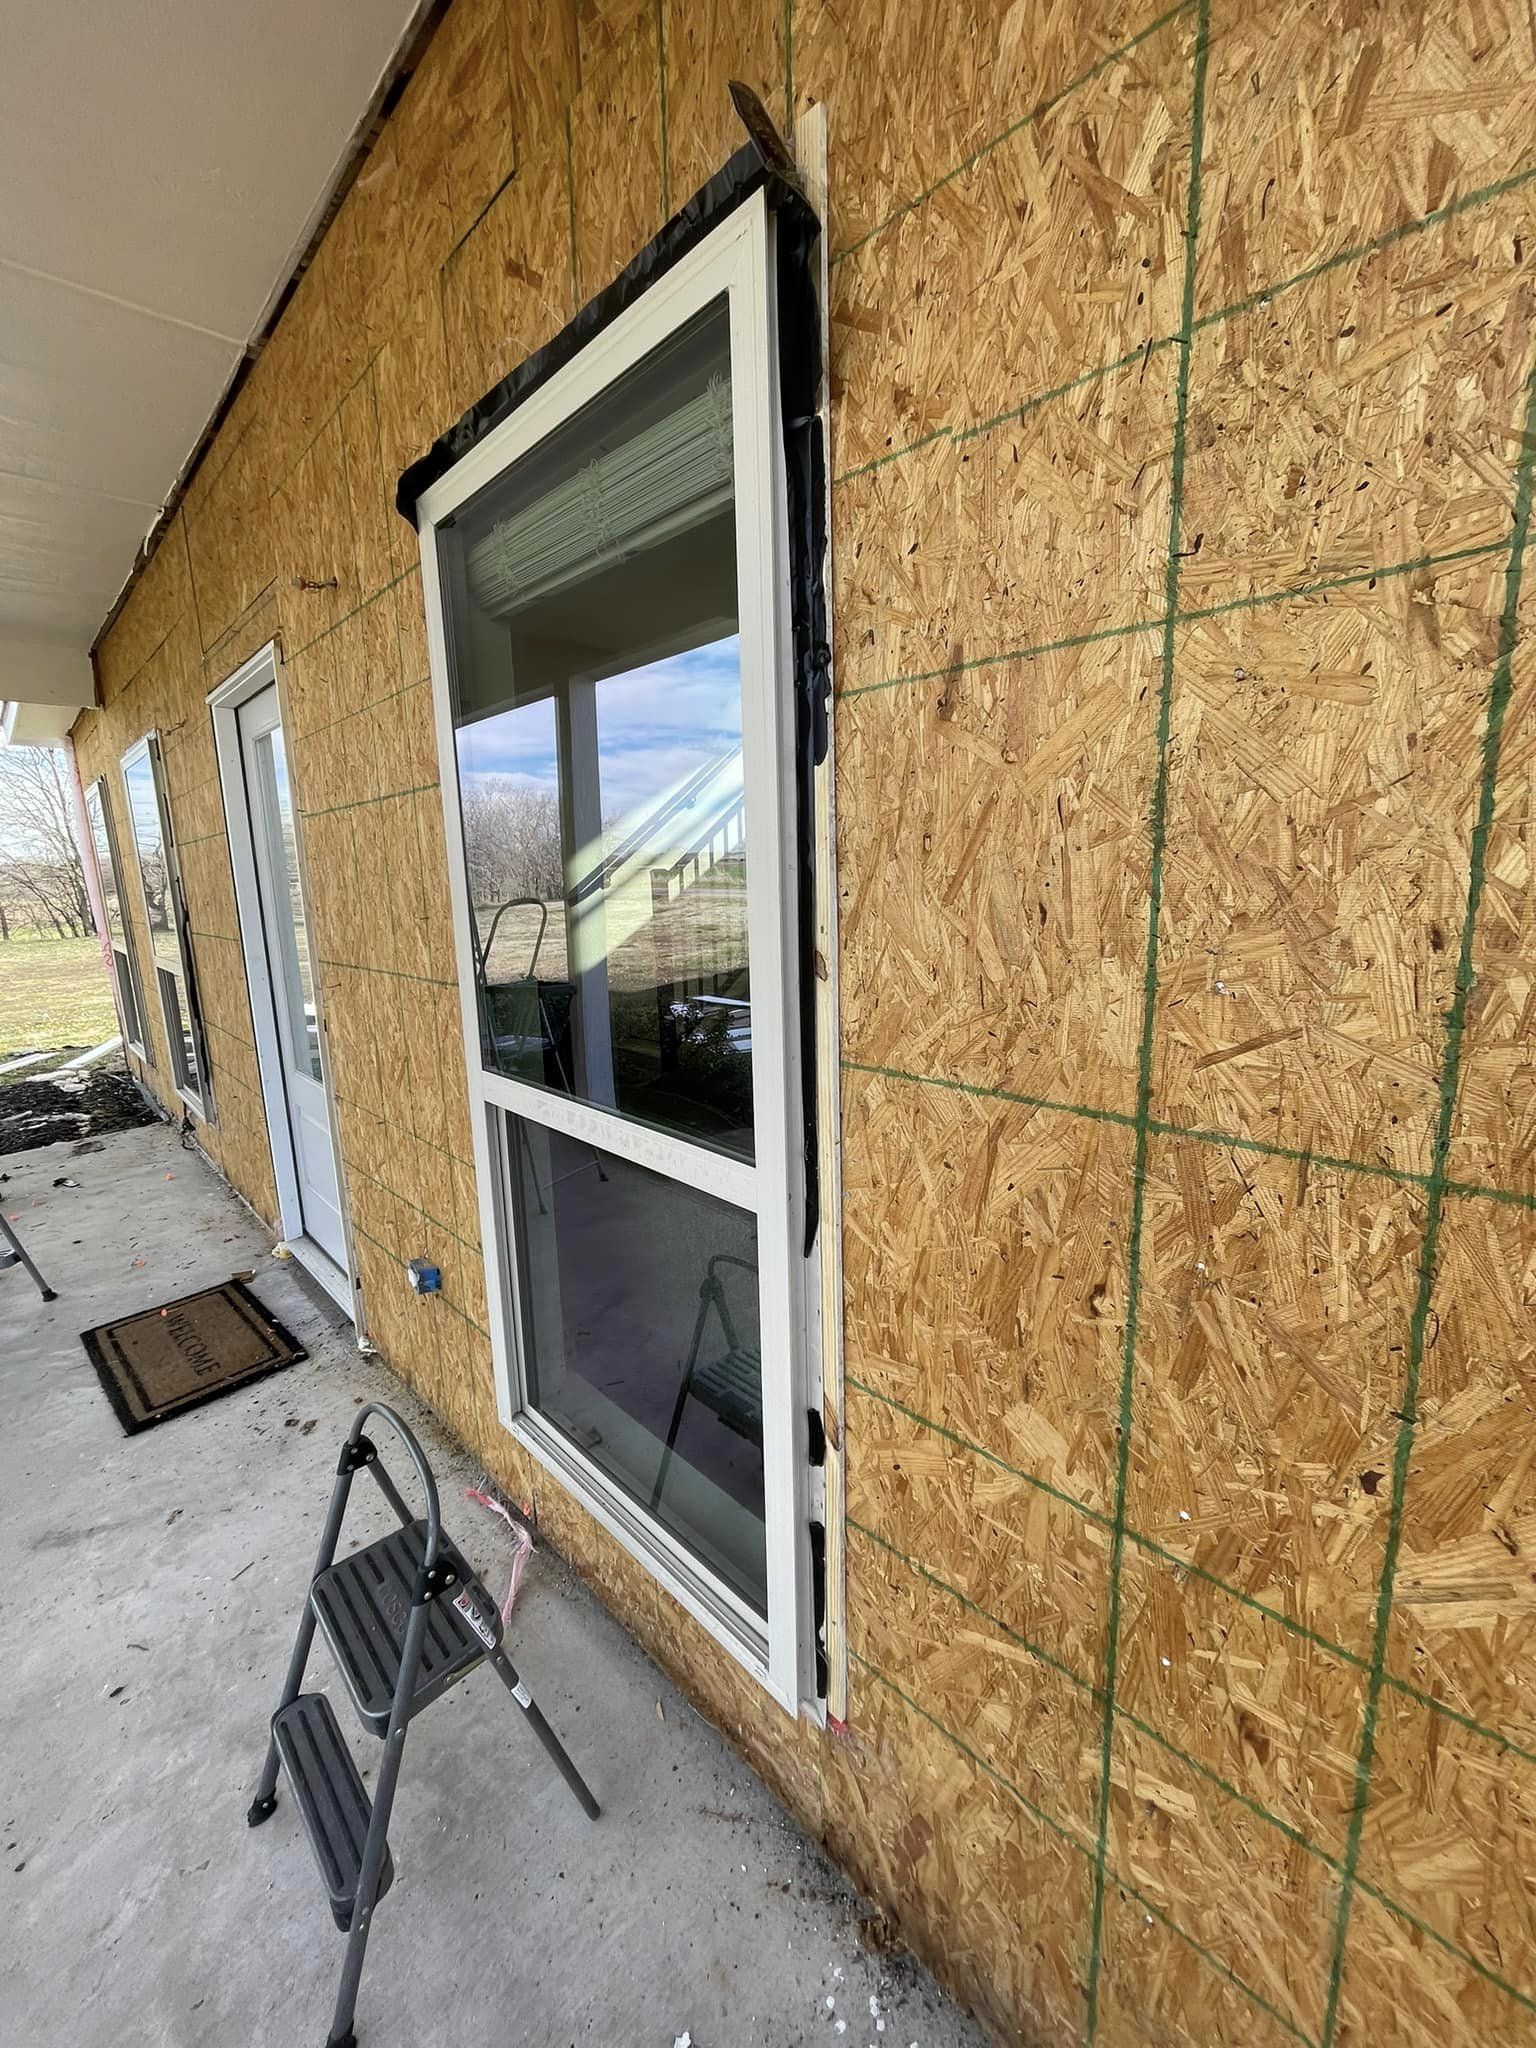
Can I leave this unconventional window shimming in place for LP smartside, or should I remove it?
1 year ago
Last Updated: May 13, 2024
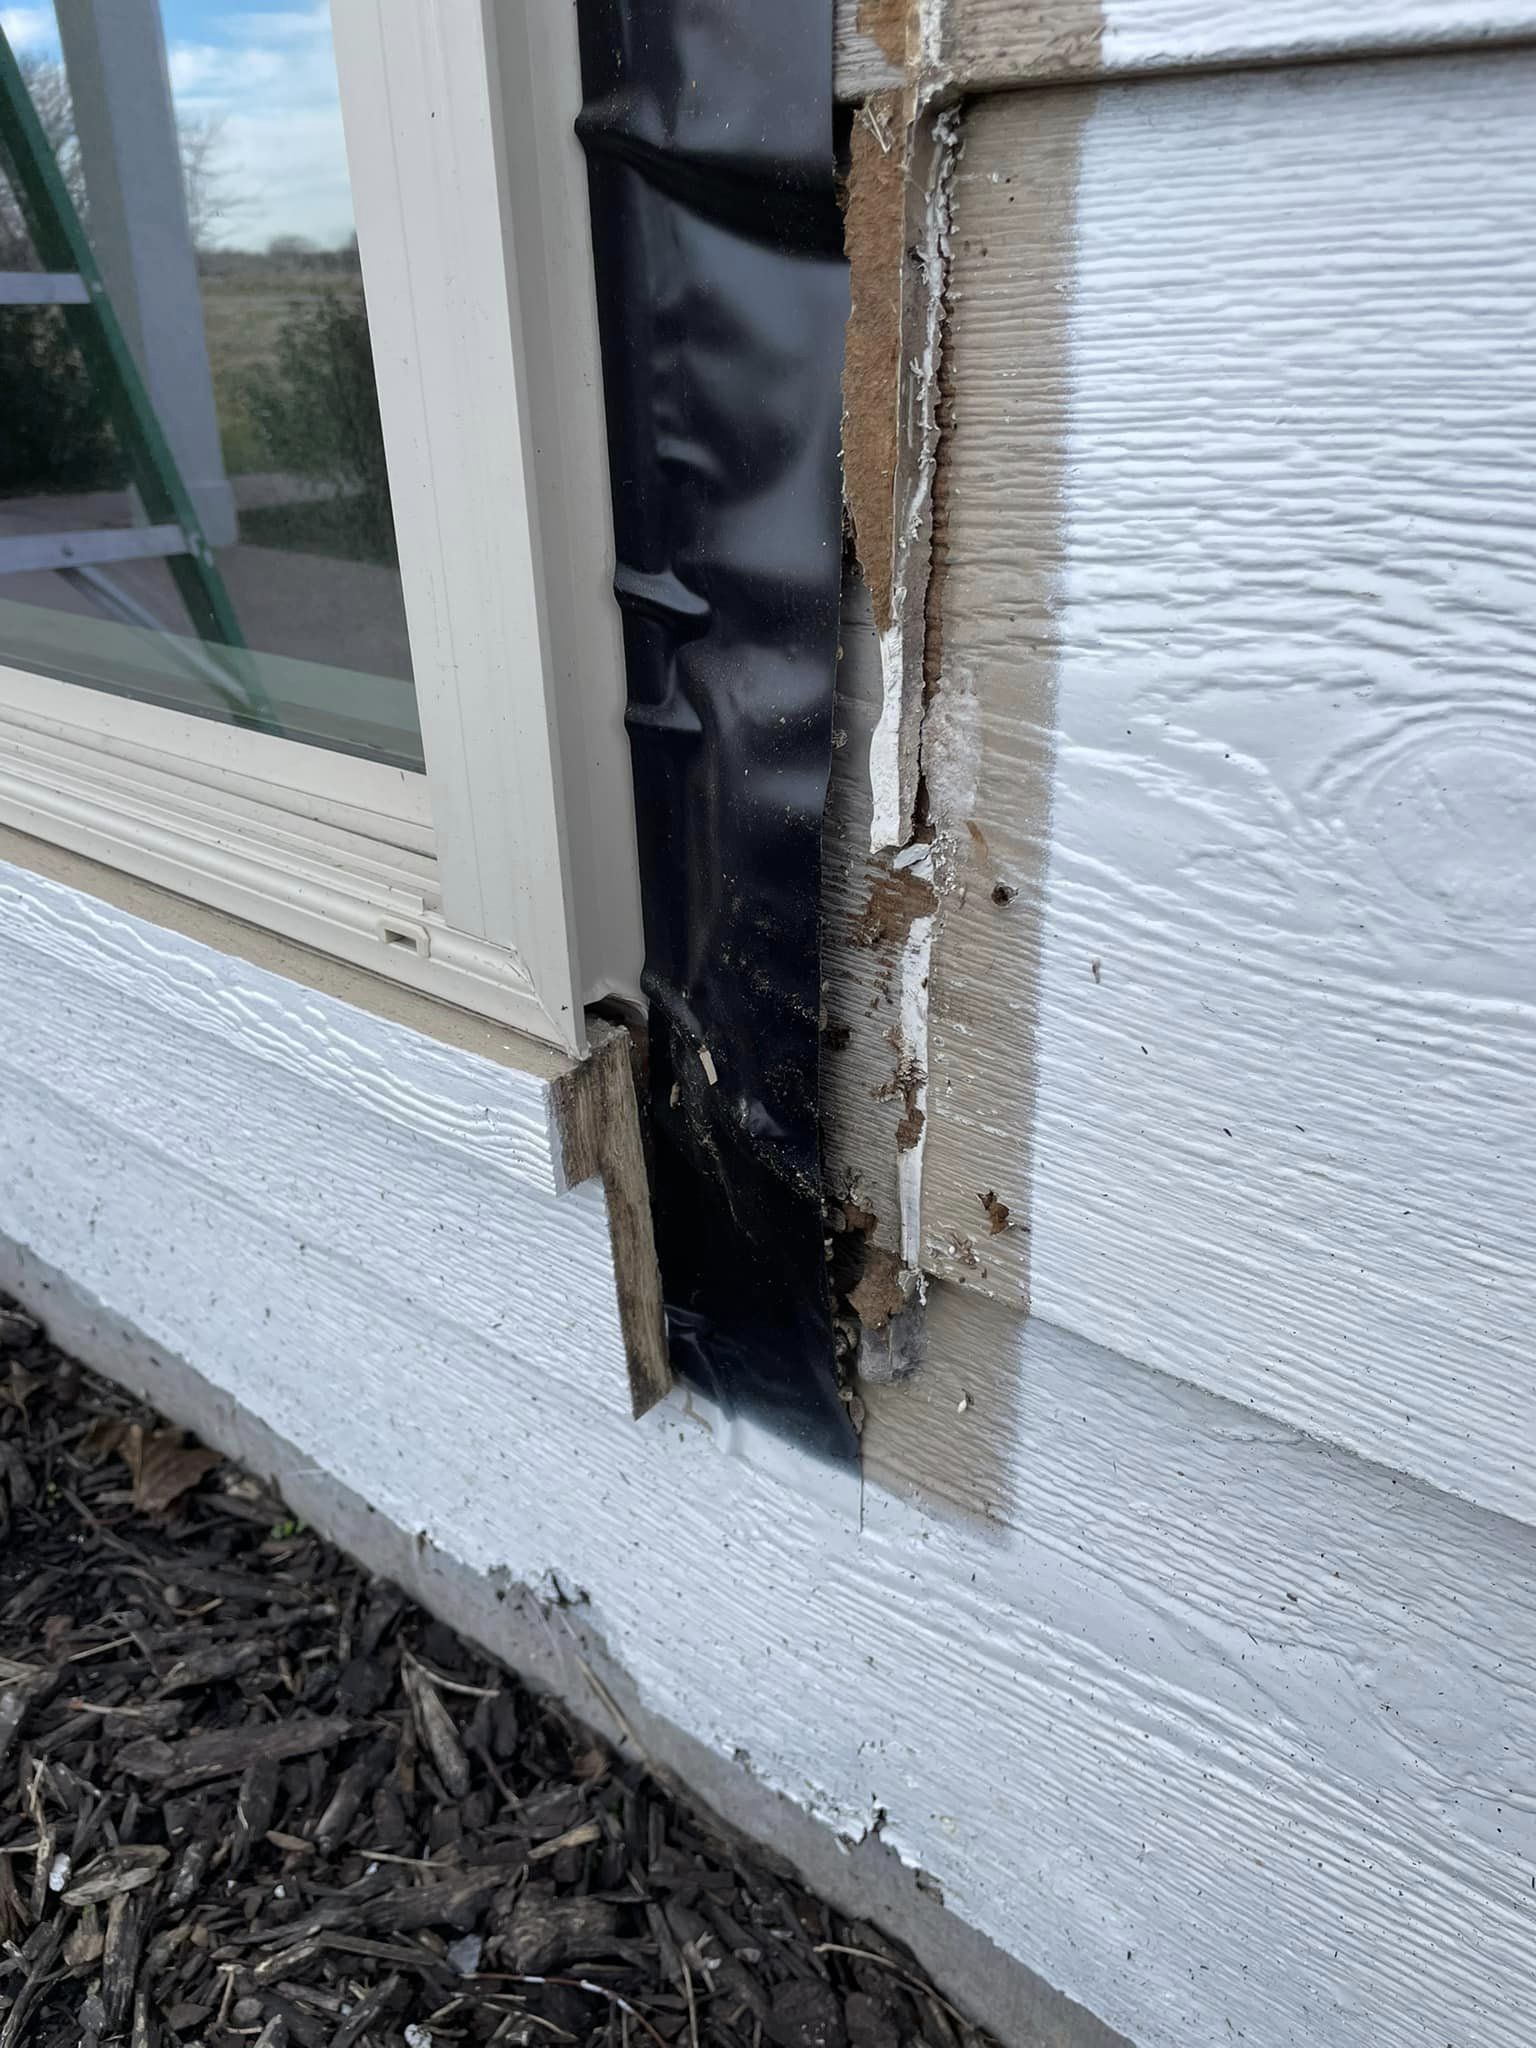
Hey everyone, quick question about my windows. While I was away, I had someone replace 4 windows and when I took off the siding to replace it, I found some interesting shimming.
Is it okay to leave the shimming like that for regular LP smartside? I’m not used to seeing windows set up this way.
Also, the guy who did it only used about 3 nails on each side. When I hung windows before, I was told to use a nail for every hole. What’s the correct way to do it?
Lastly, any advice on removing old zip tape? Can I just trim it and put new tape over it, or is there a better way?
Thanks for your help, you guys have been great with answers so far.
Following
In my years of experience, I’ve fitted countless windows, and I can tell you that not every hole requires a nail. It’s best to focus on nailing a bit more on the top and bottom sections.
Make sure to use a roofing tack with a large flat head. Hammer it into every other slot. Remember to put on your house wrap before taping the window flange to it, leaving the bottom untaped to allow for drainage in case of water infiltration. Check if your window sills are properly sealed with tape or house wrap. If not, consider resealing or starting window prep from scratch. I hope this information is useful. Best of luck!
Every second slot
This is completely incorrect. You should demand that the contractor corrects the installation and flashes it properly. Otherwise, consider hiring an attorney to pursue damages. This installation is terrible and far from being flashed correctly.
Believe me, this is the only right solution to this issue
It’s terrible when service members get exploited during deployment. Putting your life on the line and they’re just trying to scam you… You should definitely pursue this. Maybe look for a company owned by a veteran that can help until you can legally recover your money from that guy. I feel really bad that this happened to you
This installation is totally messed up. Such a mess
For every other 3 or 2, we typically follow that depending on the window size. I would definitely ask them to return and correct the flashing
I have a feeling he didn’t touch the interior trim, so the new window ended up being deeper than the old one. They didn’t bother taking off the trim and adding new extension jams; they just added padding on the exterior and installed the window.
If your understanding is right, then wouldn’t the window’s depth pose a problem on the interior by protruding from the walls?
I believe he mentioned that the new windows were deeper, thus instead of redoing the interior trim, he extended the window so they would be flush on the inside, but now they protrude on the outside.
Yeah
The tape goes on the rough in, and needs to be lapped, and folded inside. I’m a bit confused by what I see there… haha
What is that stuff on the side? Seems like an air-conditioner extension or something… haha
It sounds like you unfortunately hired someone who claims to be a contractor but doesn’t do a good job. Even if you convince them to return, I wouldn’t expect the work to be done properly. I suggest removing the windows and starting over. Check out this video for a demonstration of how I would install flanged, vinyl frame windows: https://youtu.be/ycdgjUZf0H0?feature=shared
This nail pattern looks good. I’m not exactly sure why the windows were shimmed out with strips behind the nailing fins. If it was done to accommodate the wall thickness or exterior trim, then building out like that is acceptable.
Are you planning to use vinyl siding? Those windows seem to be designed for that.
That’s a problem too. The weep holes will direct water right onto that unpainted sill, which isn’t even sloped away.
Did you have the contractor install the windows while the old siding was still up? And now you’ve removed the old siding all the way to the sheathing? Is that why they were shimmed out like that? It can be tricky to install new construction windows with hard siding like that. I see a few issues here. They probably should have cut back the original siding so you could attach the nail flange to the sheathing and then framed the window with a thicker board. Now that you’ve removed the old siding, the shimming seems unnecessary, but it looks like the opening wasn’t flashed correctly. The windows need to be taken out, properly flashed, and the nail flange attached to the sheathing. It might also be a good idea to use Tyvek house wrap before doing any of that.
Make sure to remove the windows completely and install them properly. Remember to document everything well and consider seeking legal advice to address the terrible situation of being ripped off.
It appears that the OSB is getting waterlogged. Hopefully, you are in the process of removing it all.
Español ^^^ as Gary had recommended.
Wouldn’t it have been better to use replacement windows instead of new construction windows?
Luckily, your roof overhangs are quite generous. However, the work was rushed and not done properly. It would have been more beneficial to have the siding done along with the windows, and to supervise the process more closely.
One valuable lesson I’ve learned from all my home improvement projects is to never leave a contractor unsupervised. Asking questions and staying involved while they work is crucial to ensure they don’t cut corners. It’s a tough lesson to learn, but you’ll never forget it!
I can’t help but cringe when I see that OSB.
Hey, is your first post from the right leaning forward?
Oh, Sue. Make him suffer with all those legal fees.
All those people suggesting lawsuits have no idea what they’re talking about. They don’t know the specifics of your contract and are simply speculating. Unless the contractor had superpowers, they couldn’t see behind the trim. The incorrect installation is likely due to interior issues that required extra work. Removing the siding means the window installer only took off the trim. Reset the windows ensuring the rough opening is slightly larger than the new window for adjustment. Nail every other hole with screws or every hole with 2.5” roofing nails. Use quality caulk and paint, don’t skimp on materials.
You hit the nail on the head. Thanks!
Yup, using legal fees as a tactic for revenge is pretty pointless. You really need to know the whole story before making comments like that – it just shows a lack of understanding. Wondering how legal fees are created? Well, you start by creating some for yourself! For a situation like this, you’re looking at starting costs of 5-10k due to the complexity. By removing the siding, he’s basically removed any chance of proving the original installation. So, you’re looking at around 20k just to start with a weak case. The contractor simply has to show up and say it wasn’t like that when they left, and present one photo as proof. My 30 years of experience in contracting led me to give you solid advice. You’re just a troll spreading hate without thinking. Stick to what you know.
It seems like someone wanted to avoid cutting the sill/drywall or trimming the window jambs. That’s the impression I get. It may be a hassle, but this method could lead to leaks in my opinion.
Check out Thermalbuck.com, it offers a window mounting system for your situation. I personally used it in my own home.
The correct solution here is that if you’re nailing your replacement windows to the house, then you’ve purchased the wrong ones. It surprises me that you’d invest in LP smart siding only to then buy the cheapest windows with a nail flange to go behind the siding. What’s the plan when those windows need to be replaced again in just a few years?
Those windows have a built-in J-channel for vinyl siding, but they’re not the best choice. Windows with nailing flanges are a better option. Your installer should have cut back the siding for the window trim instead of taking shortcuts.