Can I install vinyl plank flooring in my foyer and living room/dining room, and how should I handle the bay window and transition from front to back?
Thank you for accepting me! I have a question about installing vinyl plank flooring. I’ve included a floor plan to give you a better idea.
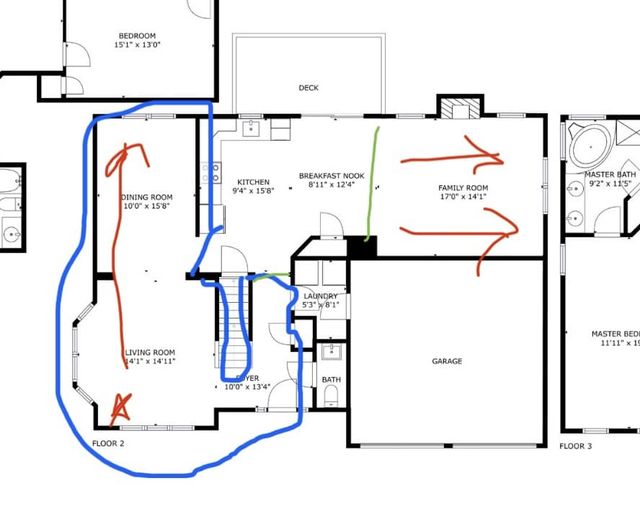
We installed LVP in the family room when we moved in 2 years ago. It goes from right to left (red arrows).
Currently, the foyer has builder grade hardwood and the living room/dining room is carpeted (blue circle).
We are planning on adding the same vinyl flooring in those areas as well.
My plan is to start in the living room where the red star is and work my way down that left wall.
My first question is about the bay window – should I tackle that area first or just treat it like any other section of the room?
Secondly, is it okay to lay the flooring from front to back? The family room is laid from side to side, but the kitchen area in between is ceramic, creating a clear separation.
Thanks a bunch in advance!

I’m a bit confused by your question about the bay window. Are you saying you fill that space with LVP as usual, but cut it at an angle? And do the windows extend all the way to the ground?
As for the direction of the planks, I think your approach makes sense. I’ve even laid planks in different directions where they meet and just used a transition strip between them.
I agree with Dave. Typically, flooring is laid in the direction of the longest room dimension. If two rooms meet and the flooring is going different directions, that’s fine. A transition piece can be used to create a border for each room and visually separate them. Even in more open concept homes where all the flooring goes in the same direction, transition pieces are often used in large doorways to distinguish one space from another, or to allow for different types of flooring in different areas. I came across this photo online as an extreme example. Here, tile is used as a transition piece with flooring going in opposite directions. A single piece of wide hardwood, with the correct thickness, could also be used as a common solution. There are plenty of great ideas online with images that you can look into.
‘t overthink it. Simply install it following the direction of your red arrows. Cut the angles for the bay.
I recommend finding the center line that matches the direction of your planks and experimenting with the layout to avoid ending up with small pieces by the wall. If adjustments are necessary, you can establish a new reference line.